Pencil Techniques and Sphere
In this lesson we will combine our 5 values with a series of pencil techniques. These are the pencil techniques we will cover: Parallel diagonal lines; Cross-contour lines; Cross-hatching and the Unified tone. Each technique will be combined and used with a specific value. Then we will apply this to rendering a simple sphere in 5 values.

Assignment
Materials:
- 11 x 14 pad, held vertically
- Pencils
- Pencil sharpener
- Gum eraser
- Drawing board
- The 5 Value Chart you have already created
Creating the Pencil Technique Chart:
- Open up your pencil tin and lay out the pencils in order like this: HB, B, 2B, 4B, 6B. Sometimes there will be a difference from year to year which pencils are included. If you don’t have a 6B use a 5B. If you don’t have a 2B use a 3B.
- Next, take your pad and place vertically. Draw 5 rows across. Draw 6 columns down.
- Label each column: 0; 1; 2; 3; 4; 5. These are your values.
- In the first row create the 5 values by taking your pencil and creating a tone through the boxes slowly getting darker. Go back and solidify each of these values. Look at them to see if there is a visual sweep of the values getting darker. You can use the side of your pencil 2B.
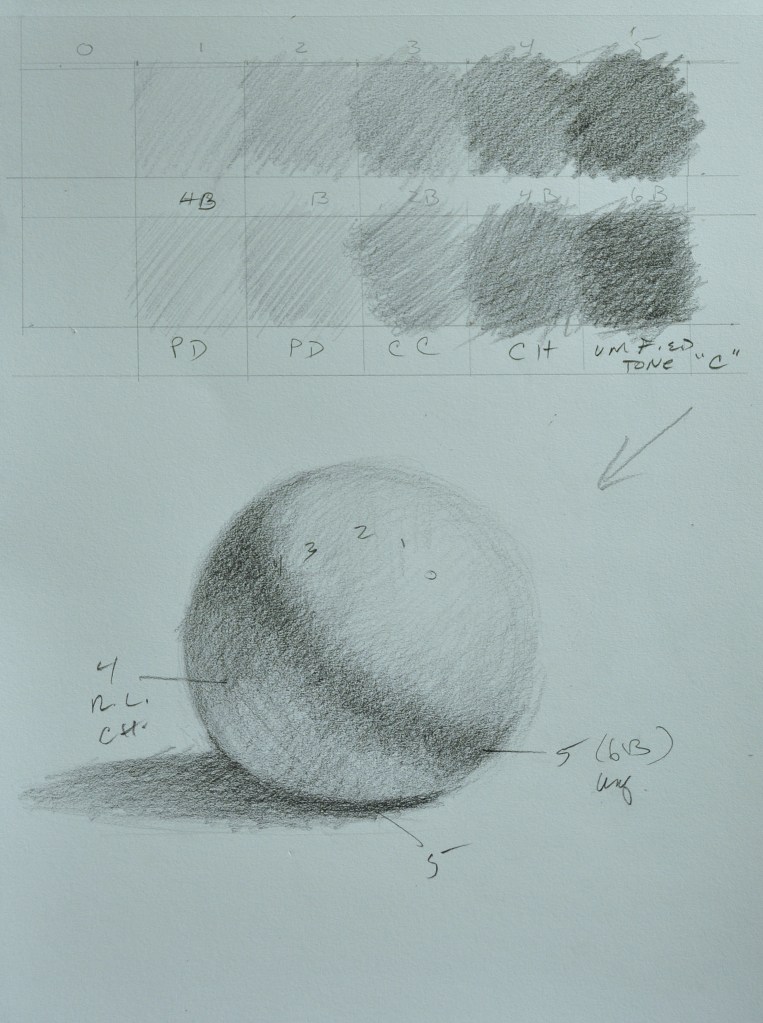
- In row 3, label the columns again: skip 1st column, value #0; HB; B; 2B; 4B; 6B.
- In row 5 [skip row 4] we are going to label the pencil technique under the value where we are going to use it: skip value #0; Value #1 is parallel diagonal lines; Value #2 is parallel diagonal lines; Value 3 is cross- contour or cross-hatch** we will do cross-contour in this square; Value #4 is cross-hatch; Value #5 is the Unified tone (cross-hatch with little “c” in the area in between the crosses.
- Go back to row 4 and fill in these squares with the proper value and pencil technique that goes with this value.
- See visual example by a former student on the Drawing Class blog site.
Upload a photo of this completed chart to the assignment section, “Pencil Technique”. The sphere exercise may be done at the bottom of this sheet as in the example.
T/TH, Due:
M/W, Due:
Assignment 2
Materials:
- 11 x 14 pad
- Pencils
- Pencil sharpener
- Gum eraser
- Drawing Board
- Sphere [This can be a baseball, orange, play ball, grapefruit etc.]
Think about your sphere:
- Place sphere on your table in the light. Make sure that about 50% of the sphere is in shadow and there is a cast shadow on the table that you can see.
- Next, identify the 5 values on your sphere. Remember value #4 and value #5 are on the Shadow side. Value #5, occupies the shadow edge, the darker areas of the cast shadow and any planes that turn away or face upward [These are usually darker, but every light situation is specific, so use your eyes].
- Value #4 is called the Reflected light and is the lighter part of any of the shadow areas.
- Value #3 is the middle value between the light and the shadow edge.
- Value #1 and value #2 are the light side.
- Value #0 is the highlight and is the value of the paper itself.
Draw your sphere:
When you understand the values, use the proper technique for that value. You will need to look at the pencil technique chart that you have created in the previous assignment. Do not get a shiny surface (this is bad technique!). If you need a darker value, try a different technique such as a unified tone. Don’t just press harder. Here again are the value and the technique you need to use:
Light side:
- Value #0- nothing, this is the white of the paper.
- Value #1, #2- parallel diagonal lines. Do not change direction. Make these all the same throughout the composition. Use HB pencil for value #1. Use B pencil for Value #2.
- Value #3- Middle value. Cross-contour lines or on occasion, cross-hatch. Use 2B pencil.
Shadow side:
- Value #4- general value of the shadow side. The reflected light, the lighter part of the shadow area. Use cross-hatch. Use 4B pencil.
- Value #5- The shadow area where it is the darkest. This includes the cast shadow and its darkest areas. Use the Unified tone. Use 6B pencil.
This sphere can be rendered at the bottom of your pencil technique chart as in the example.
Upload a photo of your completed sphere in the assignment section.
T/TH, Due:
M/W, Due: